Thursday 27 September 2018
Thursday 16 April 2015
Dana 30/44 Axle Tube seals
I have been selling and using axle tube seals for a long time now, and a couple of the problems I have found when people purchase them and fit them there selves is not clearing out the axle tubes before fitting, and not cleaning up the axle shafts. Below I have described how I fit these items, and I hope this helps people.
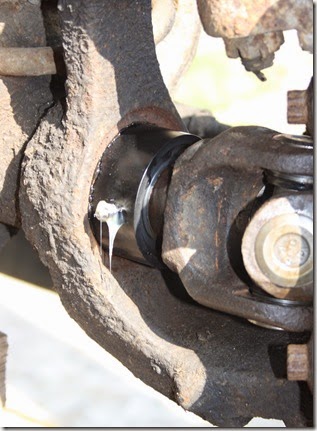
| First “What is an axle tube seal?” An axle tube seal replaces the plastic style washer that is fitted to the axle shaft. As you can see from this photo there is a gap between the axle housing and the washer. So water and mud/grit/dirt can enter the axle tube. The seal to prevent oil escaping from the diff is at the pumpkin end so the whole axle tube can fill up. This build up of debris can sometimes cause the seal to fail, and to replace the seal the diff has to be removed so not a quick job. The idea of the axle tube seals is to prevent water and mud/grit/dirt entering the axle tube in the first place. | 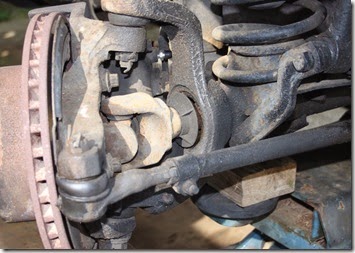 |
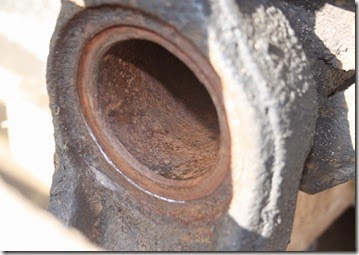
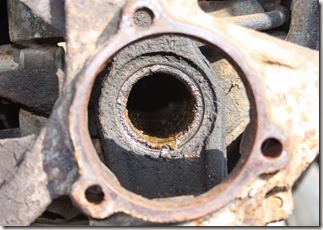 | With the axle shaft removed take a torch and have a look down the axle tube, if you have been off-road with the Jeep you might be surprised at how much muck has built up in the tube. |
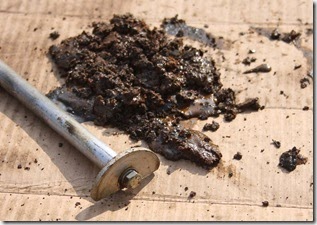
| Now this is where some people have gone a little bit wrong. They fit the axle tube seal and push the axle shaft back in. The only problem with this is the shaft slides along the bottom of the axle tube pushing the debris into the axle housing/pumpkin, this can cause premature bearing failure. A simple solution is to make a tool to clean out the axle tube. Here you can see what I use, but a simple way to make one is a length of threaded rod and a large repair washer. Get a washer just slightly small in diameter then the inside of the tube, and cut it just above the hole in the centre, fix this to the thread rod with a couple of nuts. You can now slide this into the axle tube with the flat section to the bottom, when you reach the inner seal rotate 180 degrees and pull out. Repeat as necessary, I normally finish off with a vacuum cleaner to remove the last bits. | 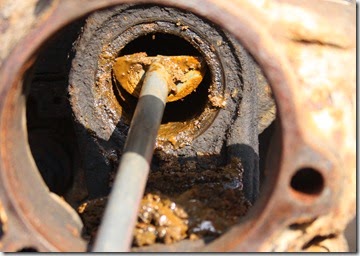 |
| As you can see from the photo below this would not be good in the diff. | Once the tube is cleaned out, remove any rush from the outer surface and the first 75mm of axle tube, this will make it easier to install the axle tube seal. |
 |  |
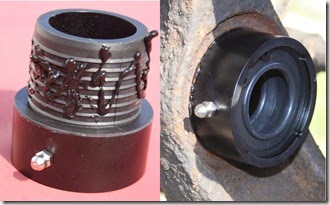 | Put some good quality RTV on the section that pushes into the axle tube. Then push the axle tube seal into the axle tube with the grease nipple facing to the rear. Sometimes it may be necessary to use a block of wood and hammer to tap the seal all the way home. |
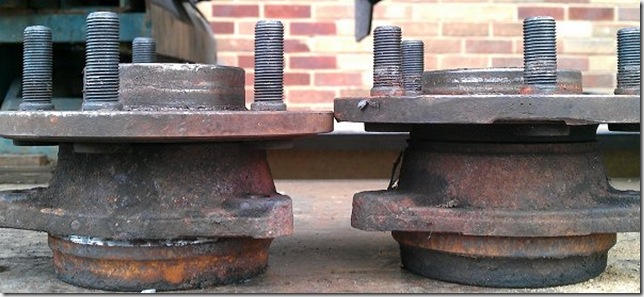
| The next area were problems can occur is in the fitting of the axle shaft. Over a period of time corrosion may have built up on the axle shaft this needs to be removed as when you slide the axle shaft through the seal a rough surface may tear the seal. I use a wire brush on an angle grinder to clean the axle shafts, paying particular attention to the area that will rotate inside the seal. As you can see from the photo on the right, before and after. | 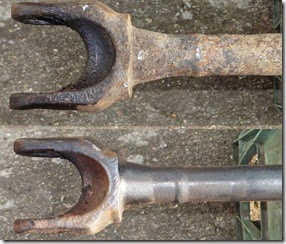 |
 | The finished install, once the shaft and the hub fitted do not forget the pump grease into the seal nipple. This fill the void in the seal and prevents dirt from getting past the seal, do not forget to grease this on a regular basis. The axle tubes seals are available for Wrangler YJ / TJ/ JK and Cherokee XJ and Grand Cherokee ZJ’s. For all you enquires contact FTE 4x4 Specialists Ltd on 01268 777719 / 07973 198483 or email info@fte.co.uk Follow us on FaceBook or Google+ |
Monday 27 January 2014
Fitting axle tube seals to Teraflex Tera 30
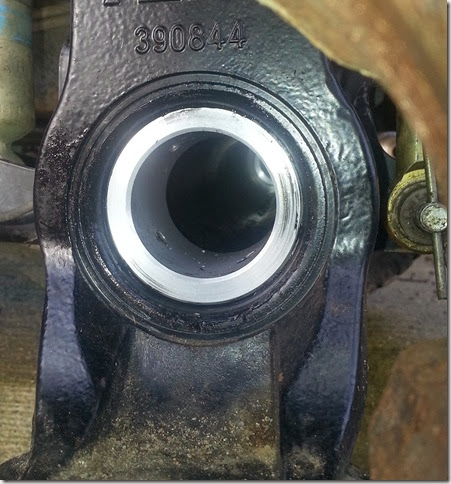
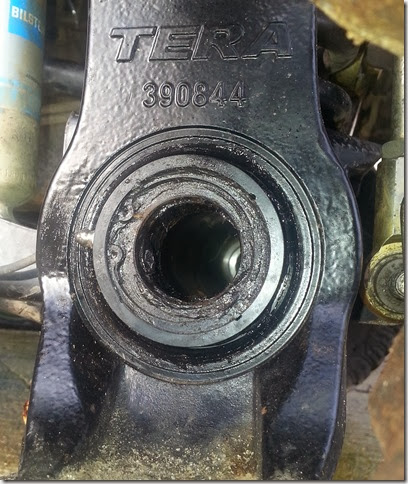
Recently we had a customer upgrade the front axle in there Wrangler JK to the Teraflex Tera 30, in his stock axle he had axle tube seals fitted which he wanted transfer over to the new axle. As you can see from the first photo the inside diameter of the Tera 30 is a lot larger. 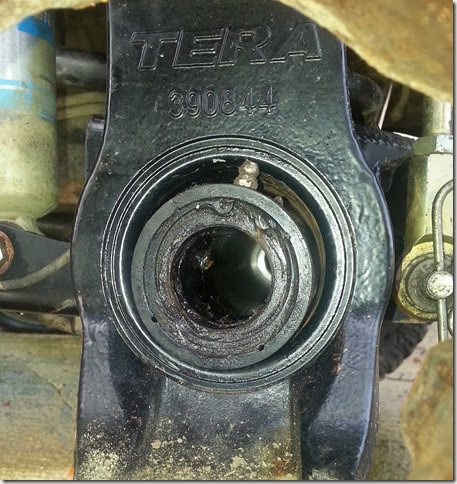
So we machined up some aluminium adapters, these were fitted with stainless steel grub screws, these were slid into the axle tube with sealant and clamped in place with the grub screws.
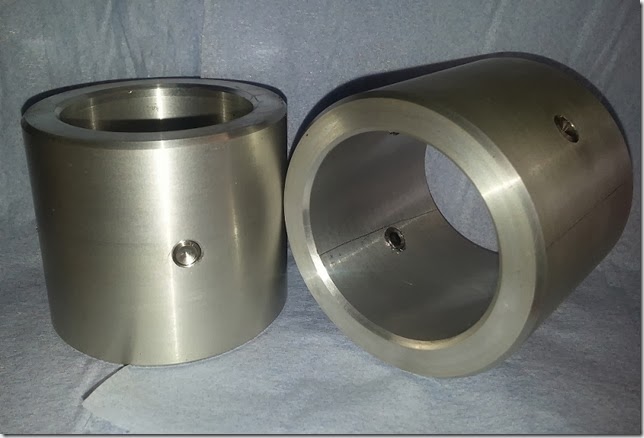
The axle tube seals were then tapped into place.
Here at FTE 4x4 Specialists we like building special parts to overcome problems. If you need a problem over coming then contacts to see if we can help. info@fte.co.uk
Tuesday 18 September 2012
Do you have reduced steering lock?
So why do I need a FTE Steering Damper Relocation Bracket ? See photo below!
As you can see from the photos above the left hand lock (sitting in the Jeep) is a lot less then the right hand lock! The reason for this is two fold, the Wrangler is fitted with an aftermarket steering damper which is larger in diameter then the stock unit, and the drag link is running at a steeper angle due to a lift kit being fitted. As you can see from the photo below the steering damper is binding against the drag link when on left hand lock.
The FTE Steering Damper Relocation Bracket kit is designed to be a bolt on unit and moves the axle end mount up by 40mm giving clearance.
Check back next week, when there will be a full install.
Wednesday 15 August 2012
Not all hubs are the same
I have just had a customer’s 98 Wrangler in for a squeaking noise.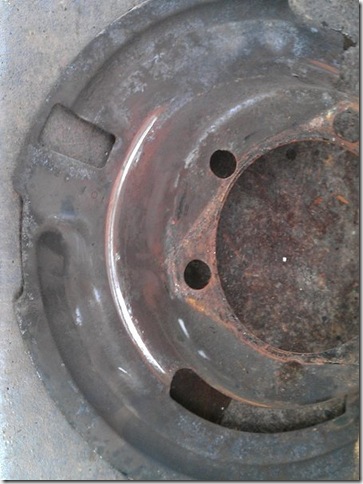
On stripping down the front hubs a bright wear mark could be seen on the dust shield, on the N/S. On checking the hub, it was found to be a 2000>2006 hub. In 2000 Jeep changed the hub off-set by approximately 5mm, requiring the disc to have a shallower off-set. There is no reason why you can not run later hubs on a pre 2000 Jeep but you must change the discs to match.
The garage that carried out this work, could not been aware of the change that Jeep introduced. On the O/S the Wrangler was still running the stock 98 hub. So be aware, make sure the garage you use knows about Jeeps, otherwise they can cause more problems then they fix.
Monday 30 January 2012
Letting The Air Out
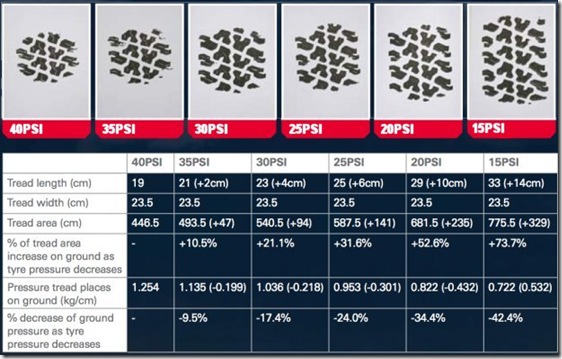
So do you air down your tyres when you go off road, a lot of folks don’t! Airing down is the best thing you can do for off-road performance, second only to running lockers in your axles. The difference between aired-up and aired-down on the trail can be staggering. So why does airing down make such a difference, people always think that by airing down you increase the width of the contact patch of the tyre, this is true but it also increases the length of the contact patch, so it puts more rubber in touch with the ground, more rubber in touch with the ground means more traction. The table below shows how the contact patch of the tyre grows as the pressure goes down.
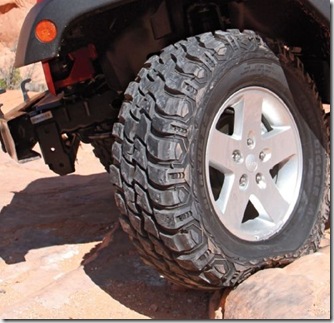
Another advantage to airing down is the way the tyre will deform to follow the contours of the ground, the photo below illustrates this very well. If the tyre can conform to the obstacle it is trying to climb over the rolling resistance will be reduced, which means a lots less effort is required.
So now that we have established that airing down tyres is a good thing how low can you go? Here is an extract from JP Magazine
“Keeping-It-Low Cappa
Almost everyone I meet runs too much air pressure in their Jeep's tires both on- and off-road. Like Christian, I cringe when I see beadlocks on a Jeep where the tire barely has a sidewall bulge. The owner generally considers 25 psi aired down since he runs the max sidewall-listed pressure of 35-50 psi on the street. Not only is he prematurely wearing out his tires, but he's rattling his teeth loose and giving up a ton of off-road performance. This is even more widespread now that 16-, 17-, and even 18-inch wheels have become common on small Jeeps, whereas before these wheels and higher-pressure tires were typically only found on 3/4- and 1-ton trucks.
Running the correct tire pressure starts by picking the correct tires. Most Jeeps only need a load range C tire. The D- and E-rated tires are for heavy-hauling trucks. With a C range radial tire most Jeeps can run about 20-25 psi on the street. Most bias-ply tires can hold up a Jeep with about half that. Off-road I consider 10-12 psi a good starting point for a radial tire and I'll often go lower than that if the terrain is really soft and there are few tire hazards. On a bias-ply tire you really don't get a good traction bulge until you hit the single digits, so I'll start at around 5-10 psi and go down from there if need be. To some people these pressures sound unreasonably low, but they increase traction significantly and improve the ride as well. You can either adjust your driving style to keep the tires on the beads or step into beadlock wheels if you decide to run at the lower end of these pressures.”
On my yellow Wrangler TJ with 33x12.50x15’s without beadlocks I normally drop them down to 15psi. Many people have different opinions as to how much to air down when off roading, so find what works for you and your setup. But be sure to be careful, it must be noted that we are only talking about and recommending tyres pressures being lowered while off road and at lower speeds, NOT driving on the road or at higher speeds.
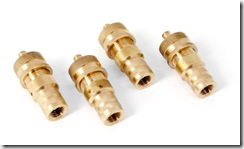 So how do you air down your tyres, if you have every tried doing it will a a match stick pushing the valve down you will know how long it can take. There are a lot of devices out there to make life easy, but the one I favour is the Rugged Ridge adjustable tyre deflators, once you have set them up to the pressure you want, you just screw them on to the valves and go have a cup of tea. Once they have finished hissing unscrew them, and you are god to go. The Rugged Ridge tyre deflators are available from FTE 4x4 Specialists Ltd.
Don’t forget that once you have aired down at the end of the day you need to pump the tyres back up.
Friday 25 November 2011
DELTA... THE RIGHT LIGHT...
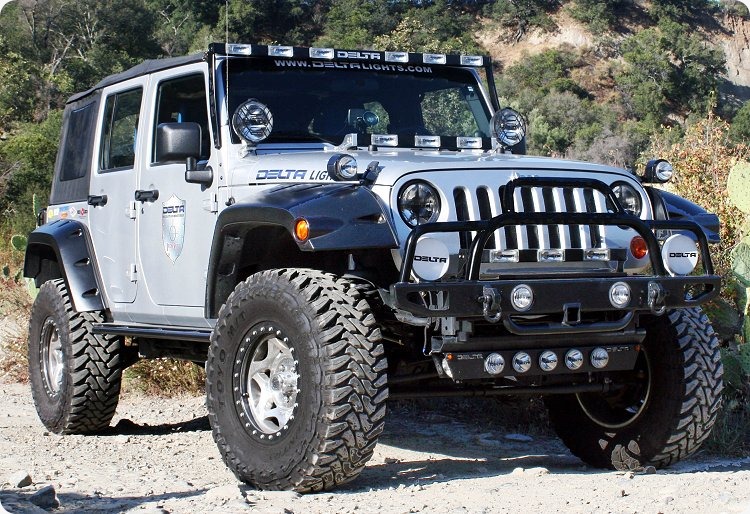
FTE 4x4 Specialists Ltd. is please to announce that they are now a dealer for Delta Tech Industries otherwise known as Delta Lights, they offer a very diverse range of lights covering all aspects of vehicle lighting especially Jeeps. Below is just a sample of what they have on offer specifically for the Wrangler TJ & JK, to check out there full range of lights go to Delta Lights website.
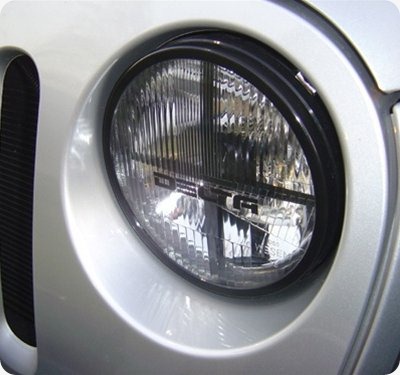 The Delta Quad bar Xenon Hi/Low Headlight Set for Wrangler TJ and JK with city light (side light) has built-in steel armour protecting the element. The series come with an adapter converting H4 system to H13.The headlights feature lead-crystal prismatic glass lens, vacuum metalized steel reflectors and rubber boot to seal from dust and moisture. It will outperform factory headlights 4 to1. They are also “E” Marked which makes them legal for use in the UK.
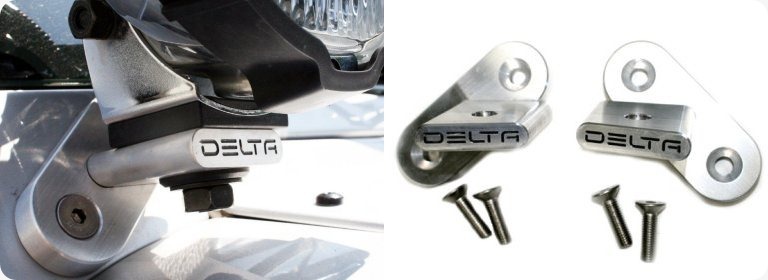
Delta Windshield T-Bracket Set was designed specifically for Jeep Wrangler both the TJ and JK. They are constructed of machined billet aircraft aluminium and use existing windshield bolt holes and thus requiring NO DRILLING. The brackets were designed for universal application and every brand of lights.
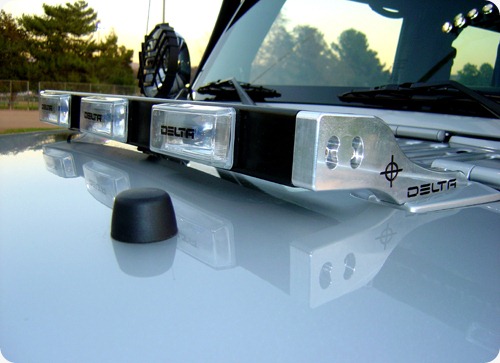
Delta Hood Light Bar was specifically developed for Jeep Wrangler JK & TJ 1997-11. It was designed to complement the Delta SkyBar and vehicle exterior design using the existing factory bolt holes thus requiring NO DRILLING. The Hood Bar is constructed of plasma cut powder coated steel cross bar and machined billet aluminium mounting arms. The Bar offers a vertical swivel for precision aiming and it comes with pre-terminated 3 (ea) Xenon 55 Watt driving lights producing an impressive beam of light for night trail adventures. Total draw 13.75 Amps, also available with 6000K HID driving lights producing an incredible powerful white “daylight” beam of light for night trail adventures. Total draw 8.75 Amps. The lights come equipped with hard plastic covers. The set is also equipped with a complete OEM harness, relay, switch and fuse.
Delta fender Light Set was specifically designed for Jeep Wrangler both TJ and JK. The set is well integrated with headlamp and fender design. It is constructed from 13 ga. powder coated plasma cut steel encasing 3” dia. waterproof xenon driving lights or Delta 6000K HID system, which will produce an impressive long range white, near daylight bright light for any type of night driving. Each light offers a full micro-adjustment for aiming. They mount to existing bolts on each front fender. NO DRILLING required.
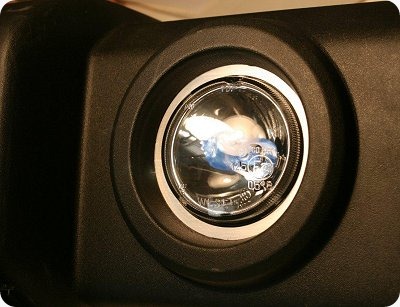
Delta Bumper Driving Lamp Set for the Wrangler JK is an upgrade to factory low wattage fog lamps. The Xenon 55 Watt driving lamps are configured into the billet aluminium face rings which provide micro adjustment for horizontal and vertical aiming. The Driving Light set comes with its own upgraded stand-alone OEM wire harness, Illuminated switch, relay and fuse. These lights will give you an increased long-range visibility when driving on narrow trails or in any adverse weather condition. Also available with the Delta 6000K HID system
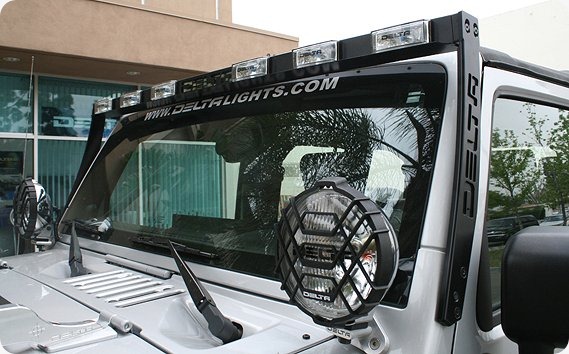
SkyBar™ - Wrangler Light Bar JK &TJ
Delta SkyBar was specifically designed for Jeep Wrangler TJ and JK. It is constructed of machined Billet Aluminium mounting arms and spacers and plasma cut 13 ga. Steel cross bar holding a battery of 6 xenon driving lights. The integrated design of the SkyBar complements the roof-line and the unique lines on Jeep Wrangler. It is designed to allow garage clearance with any lifts. The bar does not interfere with any roof, soft or hard top. The bar features a built-in deflector to eliminate glare. The light bar is wired to allow 3 phases of operation 2, 4 and all 6 lights for your full control in using just the right amount of light power from 110W to 330W with the max. Draw of 27.5Amp. The light bar offers a precision vertical aiming adjustment. The mounting billet arms attach to the side by the windshield to existing bolt holes thus requiring NO DRILLING. The SkyBar comes complete pre-wired with an OEM double harness, two switches, relays, fuses and all necessary hardware.
As I said at the begin of this article this is a very small selection of the lights that Delta have on offer, so please check out there website to see the full range. Once you have seen a light set-up you like make a note of the part numbers and drop me an email at info@fte.co.uk or give me a ring on 07973 198483 for prices and delivery. I have met the guys behind this company and there enthusiasm for there product is great as are there products.
